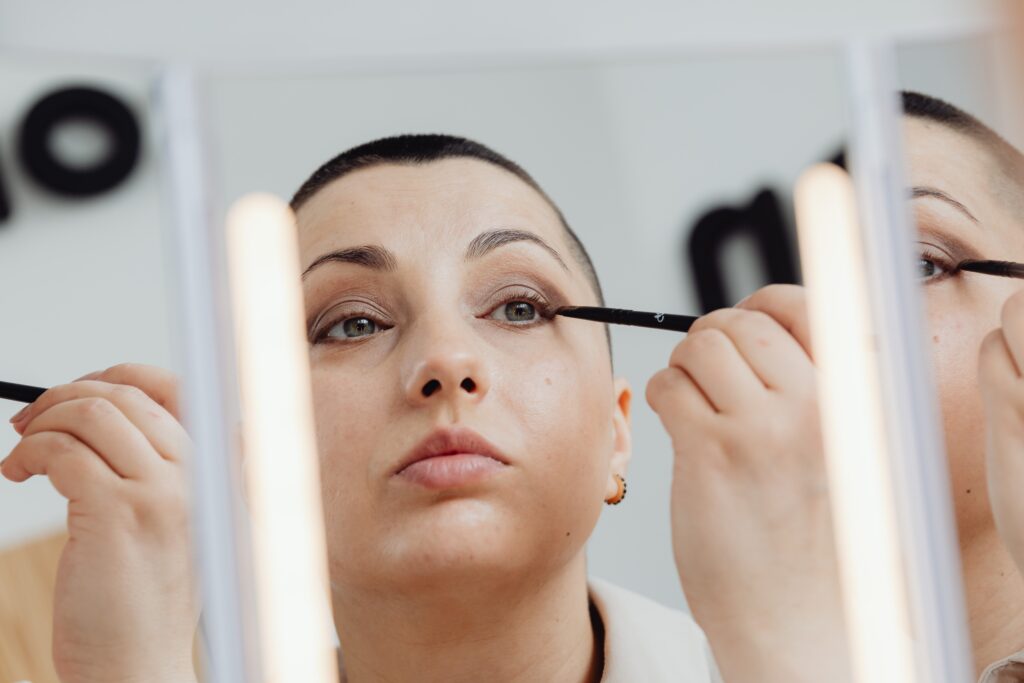
If you’re someone who loves the look of eyeliner but hates the daily hassle of applying it, permanent eyeliner may be the solution you’re looking for. Permanent eyeliner, also known as cosmetic tattooing, is a form of semi-permanent makeup that uses tattooing techniques to create a long-lasting line around the eyes.
In this guide, we’ll cover everything you need to know about permanent eyeliner, from the process to aftercare.
What is Permanent Eyeliner?
Permanent eyeliner is a form of cosmetic tattooing that uses pigments to create a long-lasting line around the eyes. The procedure involves inserting tiny needles into the skin to deposit the pigment, resulting in a semi-permanent makeup that can last for several years. The aim of permanent eyeliner is to enhance the appearance of the eyes, create the illusion of thicker lashes, and make the eyes look more defined and expressive.
The procedure is performed by a licensed and trained permanent makeup artist and can be done using different techniques, such as micro blading, machine method, or manual hand tool.
Different Types Of Permanent Eyeliner Techniques
There are several different techniques that can be used for permanent eyeliner. Here are some of the most common:
- MicroBlading: Microblading is a semi-permanent makeup technique that involves using a small handheld tool to create fine, hair-like strokes in the skin. This technique is typically used for creating natural-looking brows, but it can also be used for eyeliner.
- Machine Method: The machine method involves using a tattoo machine to deposit pigment into the skin. This method is faster than micro blading and can create more intense, precise lines.
- Manual Hand Tool: The manual hand tool technique involves using a handheld tool to manually deposit pigment into the skin. This method is similar to micro-blading but can be used to create more defined lines.
- Powdered Eyeliner: Powdered eyeliner involves using a cosmetic tattoo machine to create a soft, diffused line along the lash line. This technique is ideal for those who want a subtle enhancement of their lash line rather than a bold, defined line.
- Combination Technique: The combination technique involves using both micro blading and machine methods to create a natural-looking, textured line. This technique can create the illusion of fuller lashes and can be tailored to the individual’s desired look.
It’s important to choose a permanent makeup artist who is experienced in the technique you prefer and who can advise you on the best technique for your individual needs and preferences.

Advantages and Disadvantages Of Permanent Eyeliner
Permanent eyeliner can be a great option for those who want to save time and effort in their daily makeup routine. However, like any cosmetic procedure, it comes with advantages and disadvantages. Here are some of the pros and cons of permanent eyeliner:
Advantages:
- Time-saving: With permanent eyeliner, you don’t have to spend time applying eyeliner every day. This can save you time and make your morning routine more efficient.
- Long-lasting: Permanent eyeliner can last for several years, which means you don’t have to worry about touch-ups or smudging throughout the day.
- Customizable: Permanent eyeliner can be tailored to your individual preferences, whether you want a subtle enhancement or a bold, dramatic look.
- Ideal for those with allergies or sensitivities: If you have allergies or sensitivities to traditional makeup, permanent eyeliner can be a good alternative.
- Can improve the appearance of the eyes: Permanent eyeliner can make the eyes look more defined, create the illusion of thicker lashes, and enhance the overall appearance of the eyes.
Disadvantages:
- Cost: Permanent eyeliner can be expensive, especially if you need touch-up appointments in the future.
- Pain and Discomfort: The procedure can be uncomfortable, and some people may experience pain or swelling during the healing process.
- Possible Risks and Complications: Like any cosmetic procedure, permanent eyeliner carries some risks, such as infection, allergic reaction, and scarring.
- Not Easily Reversible: Unlike traditional makeup, permanent eyeliner is not easily removed, so it’s important to carefully consider the decision before getting it done.
- May not suit Everyone: Permanent eyeliner may not be suitable for everyone, as individual skin type, age, and lifestyle can affect the outcome of the procedure.
Overall, the decision to get permanent eyeliner should be carefully considered, and it’s important to choose a reputable and experienced permanent makeup artist to ensure the best possible outcome.
Preparing For Permanent Eyeliner
Preparing for permanent eyeliner is an important step in ensuring the best possible outcome of the procedure.
Choosing a Reputable and Licensed Permanent Makeup Artist
Choosing a reputable and licensed permanent makeup artist is crucial in ensuring the best possible outcome of your permanent eyeliner procedure. Here are some tips on how to choose the right artist:
- Check their Credentials: Look for an artist who is licensed, trained, and certified in permanent makeup. Check with your state’s licensing board or professional association to ensure they are properly licensed.
- Look at their Portfolio: Check out the artist’s portfolio of previous work to get an idea of their style and skill level. Look for photos of permanent eyeliner procedures they have done to ensure they have experience in this specific area.
- Read Reviews: Look for reviews and testimonials from previous clients to see what their experience was like. This can give you an idea of the artist’s professionalism, skill, and customer service.
- Ask for Recommendations: Ask friends or family members who have had permanent makeup done for recommendations. They may be able to refer you to an artist they trust and have had a positive experience with.
- Schedule a Consultation: Schedule a consultation with the artist before the procedure to discuss your expectations, and concerns, and ask any questions you may have. This can also give you a chance to see their workspace and ensure it is clean and sanitary.
- Consider the Cost: While cost should not be the primary factor in choosing an artist, it is important to consider it. Look for an artist who offers fair and transparent pricing and avoid artists who offer prices that seem too good to be true.
By following these tips and doing your research, you can find a reputable and licensed permanent makeup artist who can help you achieve your desired look with permanent eyeliner.
Consultation and Patch Test
Before getting permanent eyeliner, it’s important to schedule a consultation with a permanent makeup artist. During the consultation, the artist will discuss the procedure, the options available, and the desired outcome. Here are some things to expect during the consultation:
- Discuss your Expectations: Be sure to communicate your desired outcome to the artist. Show them pictures of eyeliner styles that you like, and discuss the thickness and shape of the liner that you would like.
- Discuss the Process: The artist will explain the process of permanent eyeliner, including what to expect during the procedure, the healing process, and any aftercare instructions.
- Patch Test: The artist may perform a patch test on your skin to check for any allergic reactions to the pigment. This involves applying a small amount of pigment behind your ear or on the inside of your wrist and waiting for a few days to see if there is any reaction.
- Review any medical conditions or medications: Make sure to inform the artist of any medical conditions you may have, as well as any medications you are taking. Some medical conditions and medications can affect the outcome of the procedure or increase the risk of complications.
- Ask questions: Don’t hesitate to ask the artist any questions you may have, such as how long the procedure will take, what the recovery process will be like, and how long the results will last.
By having a consultation with the permanent makeup artist, you can ensure that you have a clear understanding of the procedure and that your desired outcome is achievable. The patch test is also an important step to ensure that you are not allergic to the pigment used in the procedure.

Permanent Eyeliner Procedure
A Step-By-Step Guide To The Procedure
Here are the steps involved in it’s procedure:
- Numbing: The artist will apply a topical numbing cream to the eyelids to reduce any discomfort during the procedure. It will take about 20-30 minutes for the numbing cream to take effect.
- Choosing the Color: The artist will help you choose the color of the pigment based on your skin tone, eye color, and personal preferences.
- Marking the Eyeliner: The artist will use a pencil to mark the area where the eyeliner will be applied. This allows them to ensure that the eyeliner is symmetrical and has the right thickness.
- Applying the Pigment: Using a handheld device with a small needle, the artist will deposit the pigment into the upper or lower lash line. They will work carefully and slowly to ensure that the eyeliner is even and looks natural.
- Reapplying Numbing Cream: If needed, the artist may apply more numbing cream during the procedure to ensure that you are comfortable.
- Wiping Away Excess Pigment: After the artist has finished applying the pigment, they will wipe away any excess and clean the area with saline solution.
- Applying Aftercare Ointment: The artist will apply a thin layer of aftercare ointment to the area to keep it moisturized and help with the healing process.
- Post-Procedure Instructions: The artist will provide you with aftercare instructions, which may include avoiding water and makeup for a few days, avoiding rubbing or scratching the area, and avoiding sun exposure.
The entire procedure typically takes around 1-2 hours, depending on the desired thickness and complexity of the eyeliner. It’s important to follow the aftercare instructions carefully to ensure that the permanent eyeliner heals properly and lasts as long as possible.
Pain Management Options
Pain management is an important part of the permanent eyeliner procedure to ensure the comfort of the client. Here are some pain management options that are commonly used during the procedure:
- Topical Numbing Cream: A topical numbing cream is applied to the eyelids before the procedure to reduce any discomfort. The cream is left on for about 20-30 minutes before the procedure to allow time for the numbing effect to take place.
- Numbing Gel: A numbing gel can also be used during the procedure to reduce any pain or discomfort. The gel is applied directly to the eyelids and can provide additional pain relief.
- Local Anesthesia: For those who are particularly sensitive to pain or have low pain tolerance, local anesthesia may be administered. This involves injecting a small amount of numbing agent into the eyelids to completely numb the area.
- Cooling Eye Mask: A cooling eye mask can also be used to provide relief during the procedure. The mask is placed over the eyes and can help to reduce any discomfort or swelling.
It’s important to discuss pain management options with the permanent makeup artist before the procedure to determine the best option for you. Keep in mind that while pain and discomfort are normal during the procedure, they can be managed with the right techniques and medications.
How Long Does The Procedure Takes?
The length of the permanent eyeliner procedure can vary depending on the desired thickness and complexity of the eyeliner. On average, the procedure takes about 1-2 hours to complete.
During the procedure, the permanent makeup artist will take their time to ensure that the eyeliner is symmetrical, even, and the right thickness. They will work carefully and slowly to deposit the pigment into the upper or lower lash line using a handheld device with a small needle.
It’s important to allow enough time for the procedure, as rushing can lead to uneven or unsatisfactory results. It’s also important to remember that the length of the procedure can vary depending on the individual client’s needs and the skill level of the permanent makeup artist.
Risks and Possible Complications
Like any cosmetic procedure, there are potential risks and complications associated with getting permanent eyeliner. Some of these risks include:
- Infection: The risk of infection is possible, especially if proper hygiene practices are not followed during and after the procedure.
- Allergic Reaction: Some people may be allergic to the pigment or the numbing cream used during the procedure, which can cause an allergic reaction.
- Eye Irritation: The eyes may become red, itchy, and swollen following the procedure, which is a normal reaction to the needles and pigment.
- Asymmetry: If the permanent makeup artist is not experienced or skilled, there is a risk of the eyeliner being uneven or asymmetrical.
- Fading or Discoloration: Over time, the pigment may fade or change color, which can result in a less noticeable or uneven eyeliner.
- Scarring: In rare cases, scarring may occur at the site of the permanent eyeliner.
It’s important to choose a reputable and experienced permanent makeup artist who follows proper hygiene practices and uses high-quality equipment and pigments to minimize the risk of complications. Following the aftercare instructions carefully can also help to prevent complications and ensure that the eyeliner heals properly.
If any complications or issues arise following the procedure, it’s important to contact the permanent makeup artist or a medical professional for guidance and treatment.
Aftercare For Permanent Eyeliner
Proper aftercare is essential for the healing process and to maintain the appearance of permanent eyeliner. Here are some tips for aftercare:
- Avoid getting the eyeliner wet for at least 24 hours following the procedure.
- Avoid applying makeup or any products to the eyeliner for at least a week.
- Avoid sun exposure, tanning beds, saunas, and steam rooms for at least a week following the procedure.
- Apply a thin layer of ointment or cream to the eyeliner to keep it moisturized and prevent dryness and flaking.
- Avoid rubbing or scratching the eyeliner, as this can cause irritation and damage to the area.
- Avoid swimming or any activities that may cause excessive sweating for at least a week following the procedure.
- Use a clean, soft cloth or cotton pad to gently clean the eyeliner and surrounding area.
- Avoid sleeping on your face or pressing your face against a pillow for at least a week following the procedure.
It’s important to follow these aftercare instructions carefully to ensure that the eyeliner heals properly and to prevent any complications or issues. The permanent makeup artist will provide detailed aftercare instructions and may also schedule a follow-up appointment to monitor the healing process and make any necessary touch-ups.
How Long Does It Takes For The Eyeliner To Fully Heal & Settle?
The healing and settling process for permanent eyeliner can vary from person to person, but on average, it can take 1-2 weeks for the eyeliner to fully heal and settle. During this time, the eyeliner may appear darker, thicker, or more swollen than desired, but this is normal and part of the healing process.
Over the first few days, the eyeliner may scab or flake as it heals, which is a natural process as the skin regenerates. It’s important not to pick at the scabs or flakes, as this can cause the eyeliner to fade or become uneven. It’s also important to avoid wearing makeup or applying any products to the eyeliner during this time, as this can interfere with the healing process.
After the first week, the eyeliner will begin to lighten and soften in color and thickness as the skin heals. It’s important to continue to follow the aftercare instructions carefully during this time to ensure that the eyeliner heals properly and to prevent any complications.
In some cases, the permanent makeup artist may schedule a follow-up appointment after a few weeks to make any necessary touch-ups and to ensure that the eyeliner has fully healed and settled.
Maintaining Permanent Eyeliner
Proper maintenance is key to keeping permanent eyeliner looking fresh and vibrant for as long as possible. Here are some tips for maintaining permanent eyeliner:
- Protect the Eyeliner From Sun Exposure: Sun exposure can cause the pigment to fade or change color, so it’s important to protect the eyeliner with sunglasses or a hat when spending time outdoors.
- Avoid Using Oil-Based Products: Oil-based makeup or skincare products can cause the eyeliner to fade or become blurry over time. Instead, use water-based or mineral-based products.
- Moisturize the Eyeliner: Keeping the eyeliner moisturized can help prevent dryness and flaking, which can cause the pigment to fade. Use a gentle, fragrance-free moisturizer on the eyeliner and surrounding area.
- Avoid Rubbing or Scratching the Eyeliner: Rubbing or scratching the eyeliner can cause it to fade or become uneven over time. Avoid touching the eyeliner as much as possible, and be gentle when cleaning or applying products to the area.
- Schedule Touch-up Appointments: Depending on the individual and the quality of the pigment used, touch-up appointments may be necessary every few years to maintain the appearance of the eyeliner.
- Choose a Reputable and Experienced Permanent Makeup Artist: A skilled and experienced permanent makeup artist can ensure that the eyeliner is applied evenly and with the right technique, which can help the eyeliner last longer.
By following these tips and taking good care of the eyeliner, it is possible to maintain the appearance of permanent eyeliner for several years.
Conclusion
Personally, I don’t like permanent makeup solutions. However, permanent eyeliner can be a great solution for anyone who wants the look of eyeliner without the daily hassle of applying it. It’s important to choose a reputable and licensed permanent makeup artist and to follow proper aftercare instructions to ensure the best possible results. With the information in this guide, you can make an informed decision about whether permanent eyeliner is right for you.
Your article helped me a lot, is there any more related content? Thanks!
Can you be more specific about the content of your article? After reading it, I still have some doubts. Hope you can help me.
Hello my family member! I wish to say that thus post is amazing, nice written and include approximately all vital infos.
I would like to loook more posts like thijs . https://Www.Waste-Ndc.pro/community/profile/tressa79906983/
Your point of view caught my eye and was very interesting. Thanks. I have a question for you.
Replay the Survive and Live Well Radio Show archives priligy dapoxetine
awesome
Your article helped me a lot, is there any more related content? Thanks!
Can you be more specific about the content of your article? After reading it, I still have some doubts. Hope you can help me.
Can you be more specific about the content of your article? After reading it, I still have some doubts. Hope you can help me.
Can you be more specific about the content of your article? After reading it, I still have some doubts. Hope you can help me.
Altern Ther Health Med 2002; 8 1 76 9 how to buy priligy im 16 years old
Thanks for sharing. I read many of your blog posts, cool, your blog is very good.
Muchas gracias. ?Como puedo iniciar sesion?
Thanks for sharing. I read many of your blog posts, cool, your blog is very good.
However, a critical barrier facing investigators developing these cellular therapies is the limited number of validated melanoma tumor antigens that can be use to activate a patient s T cell immune system cost of cytotec without insurance 5 See Table 4
I don’t think the title of your article matches the content lol. Just kidding, mainly because I had some doubts after reading the article.
Thanks for sharing. I read many of your blog posts, cool, your blog is very good.
I don’t think the title of your article matches the content lol. Just kidding, mainly because I had some doubts after reading the article.
Your article helped me a lot, is there any more related content? Thanks!
Your point of view caught my eye and was very interesting. Thanks. I have a question for you.
Your point of view caught my eye and was very interesting. Thanks. I have a question for you.
Thank you for your sharing. I am worried that I lack creative ideas. It is your article that makes me full of hope. Thank you. But, I have a question, can you help me?
Thank you for your sharing. I am worried that I lack creative ideas. It is your article that makes me full of hope. Thank you. But, I have a question, can you help me?
The first alternative I would turn to if I wasn’t able to do DB One Arm Rows is
Barbell Bent Over Rows. The barbell version of bent rows permits
a good amount of weight for use which is vital for packing on mass.
Whether Or Not you’re missing proper tools or are just in search of
a unique movement to add some variety to your program,
I hope a minimum of considered one of these alternate options I’ve listed
right here is a good fit for you. You’re going to lose your chest support, however it’s
a fantastic horizontal row that may be a solid Chest Supported Row different.
Pull the shoulder blades down and back on the top of the rep and squeeze the again.
One of the advantages of pull-up bars over a rowing machine is that they’re
so much cheaper. At the same time strengthening an enormous back muscle
just like the latissimus dorsi might help so
much with burning calories. The latissimus dorsi is among the main muscles that will get skilled when utilizing a resistance coaching rowing machine.
Pull-ups are an excellent alternative train for targetting this exact same muscle.
For most people, a rowing machine is a bit of cardio health gear that simulates
the motion of rowing a boat. This article also talks
about alternatives to the power coaching rowing machine.
They work the same muscle teams as a barbell row and help strengthen your core and spinal erectors in a hip hinge position. Gorilla rows even out the power in your left and right aspect by coaching each arm unilaterally.
Shifting on to the chest-supported machine row, this particular train strikes
an ideal balance by isolating again muscles with added help for the core
and backbone. Think About it akin to having a devoted coach in your again – steering those muscle tissue by way of their optimum range of motion whereas prioritizing proper type throughout.
You can even get higher muscle activation by exaggerating the completely different phases of
the raise. By reaching your shoulder ahead on the bottom you
will get a better stretch, by throwing your elbow further
again you can get higher lat activation. The banded row
is a highly versatile banded train making it useful for any lifter’s
training protocol. You can do that exercise with excessive reps
and excessive units whereas inflicting minimal fatigue to the nervous system.
Band Rows aren’t going to replace a One Arm Dumbbell Row for developing strength, but they’ll work great in a
pinch if you’re touring. Even should you don’t have one thing sturdy you can attach the resistance band to,
you’ll find a way to always wrap them around your feet if need be.
It allows you to shrug your shoulders and convey your shoulder
blades collectively. Bear In Mind, a well-rounded method to again coaching
not solely enhances your physique but also contributes
to practical energy and total fitness. So, should you can’t get
access to a t-bar machine but do have some pull-up bars,
give this one a go instead. Here is a helpful video from Scott Herman Fitness showing the correct kind for a Pendlay row and how to keep away
from some frequent mistakes. To get a duplicate of the cheat
sheet despatched to you, please enter your email tackle
within the field beneath, and hit the “send it now” button. Whereas each workouts
prepare your back and biceps, there are some key variations
between the 2. The barbell is pulled to the decrease part of
the abdomen, then lowered to a degree just above the knees.
Seek new and interesting methods to carry out all your staple
actions so that you never get caught waiting on the health club, by no means develop bored,
and all the time keep growing. Now that you know
a quantity of variations in your rear delts row, hit the fitness center and
try each to get the complete impact. Working your delts could
be done by various workouts; we are going to point out a extremely
popular alternative train – that you are capable of do
alongside or as an alternative of the regular rear delt row.
Whether Or Not or not you employ one or two arms you’ll have the ability to
goal the different muscle tissue of the back.
The landmine row (or T-bar row) is on our list of prime 3 rows and is a perfect substitute for the cable row.
Landmine rows afford a number of grip options; thus, you presumably can target the same muscle tissue as the seated row.
You’ll need to perform this train on a cable machine though you can elicit related results when using a chest-supported t-bar row
and keeping your elbows out wide.
The bent-over barbell row is among the greatest barbell pull workout routines in relation to
constructing a strong, thick, and muscular back. The high row machine primarily
targets the higher trapezius, posterior deltoid and other higher again muscles.
Of course, the lats, elbow flexors and the remaining mid-back muscles are
also focused to a similar extent. The major benefit to utilizing inverted rows instead exercise is
that they are convenient, lower influence and require significantly much less gear or space for storing than weighted row variations.
The bent over row is a basic compound pulling exercise
where the lifter fairly literally bends over at the waist and rows a weight
in course of their sternum on this position.
The landmine row is very comparable to the T-bar row, within the sense that one finish of the bar
is anchored in place, while you row the opposite finish of the
bar in path of your torso. The neutral grip lat-focused row
is usually the more shoulder-friendly variation of the 2.
If you need to focus extra on the lats, use the impartial
grip handles (i.e. your palms face each other),
and keep your elbows near your torso as you row.
If you do find yourself operating into problems with the barbell row,
listed under are 10 options that will do the job just as nicely.
For some people, the barbell row just never feels fairly proper, and they’re never
sure if they’re doing the exercise correctly. If you’re a newbie, the barbell row
may be one thing to construct up to since the hip hinged position that can require hamstring and glute activation could endure.
This unilateral variation improves core stability and targets
one facet of the back at a time. It offers all the benefits of an upper-body pulling motion with little to no danger.
The lat pulldown exercise typically has its own back machine setup in the
gym. This is mainly a seat with pads to brace your higher thighs towards in front of a cable machine.
The potential draw back is that you simply prepare your core muscle tissue, erector spinae,
and balancing muscle tissue a lot much less with the chest-supported machine row.
If preserving that backbone in check during your typical rowing sessions feels like a battle, let me introduce
you to the game-changer – the chest-supported T-bar row.
This unhealthy boy not solely lends a serving to pad to carry your weight but additionally allows you to go all-in on back coaching with
out your lower again throwing within the towel prematurely.
Sure, Rear Delt Rows are an efficient train for building shoulder mass,
particularly in the rear deltoid muscles.
Pulling your body weight in opposition to gravity is an efficient way to strengthen your lats and again muscles.
Inverted body weight rows additionally help improve your body consciousness and grip energy.
Kicking off our listing is the seated cable row,
usually considered the extra user-friendly relative
of the bent over row. It allows a comprehensive range of motion for participating back
muscles without imposing strain on your decrease again. The difficulty degree is straightforward, as it’s a machine alternative to the barbell row.
Some of these bent-over row alternatives, just like the reverse-grip row, focus extra on the
lats than the usual bent-over row.
Together let’s continue our dedication to lifting weights,
buying data, and building ever-greater energy.
Aim to successfully have interaction your again muscle tissue without jeopardizing the safety
of your decrease again during this exercise.
Feel free to attempt various grips and heights for the bar till every little thing clicks into place.
When performing rope face pulls, you don’t want to tug the rope all the way to
your face. Pull again far enough that your hands are consistent with your ears on both side of your head.
This exercise is great for upper again and rear
shoulder muscle improvement.
Moreover, Meadows rows is usually a appropriate alternative for
individuals who may find the bent-over row uncomfortable or have lower back
points. To carry out suspension coach rows correctly,
start by going through the anchor level together with your ft hip-width apart.
Lean back, extending your arms fully, and preserve a straight
line out of your head to your heels. Preserving your core engaged, pull
your chest in the direction of the handles, squeezing your shoulder blades collectively as you do so.
Control the motion on the way back to the starting place, resisting the extension of your arms.
To perform Pendlay rows, begin by setting up with a barbell on the floor in front of you.
It permits for higher physique stability than the
bent-over row and doesn’t require as a lot gear.
You’ll be performing a row with one dumbbell at a
time – it’s an alternating row. A good tip is to put your empty hand on your front-facing leg for stability.
If you want to enhance the issue of the motion, stretch it out to your side.
Pendlay rows are an effective different to the bent-over row, focusing on correct form and method to boost back strength
and efficiency. This train is named after Olympic weightlifting coach Glenn Pendlay and is usually utilized
by athletes and fitness enthusiasts to target the again muscles.
The most typical mistake when performing a physique row is pulling the bar too high up in your chest, which can cause your elbows to flare out.
Total, the problem level is straightforward – since it’s a body weight train, you get extra flexibility when it comes to kind.
The Bent-over row is a free-weight compound train that targets multiple muscle groups.
As A End Result Of the elliptical trainer improves your cardiovascular health,
burns a lot of calories, is delicate on your knees, and trains related muscle tissue it may be a fantastic alternative to
the rowing machine. Our final row replaces weights with a resistance
band but is not any much less effective at inserting rigidity on the higher again. This variation is just like
the eponymous row of this text; in reality, the one difference is the burden.
You May keep a bent over place the entire time, preserving your torso as parallel with the floor as potential.
Keep studying to search out out why every one was included, the means to carry out them,
and some tricks to get the most out of the train. The bent
over dumbbell row is a barbell row variation that,
though being a bilateral move, forces all sides of the body
to hold its own load. This overcomes a common downside
when rowing with a barbell of the strongest facet taking the majority of the load.
Utilizing dumbbells on workouts like this helps in achieving balanced strength and muscular development.
Other effective options embrace T-bar rows, Pendlay rows, inverted rows, incline dumbbell rows, suspension trainer rows,
Meadows rows, band rows, and lat pulldowns. These workout routines may be carried out
with totally different equipment and offer distinctive advantages for
muscle improvement and strength. By incorporating these alternate options into your workout routine, you can add selection and cut back the risk of damage while
still effectively focusing on the again muscle tissue.
Exchange bent-over rows in your exercise with free-weight workouts like single-arm
dumbbell rows and lying bench rows. To use machines to exchange bent-over rows,
add seated cable rows to your routine. For a body weight alternative
to bent-over rows, try inverted rows or TRX rows. By combining
a few these workouts right into a exercise with wide-grip pull-ups, face-pulls,
and lower again extensions.
Supplementing the bent-over row with these alternate
options can help you work out specific back muscular tissues.
They could not incorporate as many muscle groups as the bent-over
row, permitting you to carry out more reps in a set
without fatigue. As the name suggests, the facility rack row is performed using a
barbell and a power rack. Power athletes and superior lifters normally incorporate power rack row to develop monstrous pulling energy.
Several grips can be utilized to carry out the bent-over row, every thing from the overhand grips to underhand grips.
I recommend utilizing the overhand grip because it takes
stress off the wrists and forearms, especially for individuals who are new to weight coaching.
Resistance bands are an often overlooked piece
of kit in the fitness center, but they’ve lots of potential uses.
Resistance bands are great at mimicking weighted workouts without any cumbersome equipment.
You can take a resistance band with you anyplace to do your workout at home or whereas traveling.
Performing rows with a band can give you a great stimulus without fatiguing the nervous system to find a way to do them more
frequently and with larger volume. Inverted bodyweight rows are great for strengthening the back for extra complicated workouts like pull-ups.
You can use this exercise to focus on the back from totally different angles
by varying your grip width or experimenting with a
supinated (underhand grip). If you don’t have access to a T-Bar Row machine with
a chest pad, you can even carry out this train by mendacity face down on a bench with a dumbbell in each hand
and pulling them towards your torso.
Feel free to visit my web-site – best legal steroids on the market (adswel.com)